How to Create a Vector Glitter Text Art Effect

Follow this tutorial and learn how to create a vector glitter text effect in Adobe Illustrator. The glitter is the result of three effects: Note Paper, Stained Glass and Torn Edges but then we will use Live Trace to turn the glittery texture into a vector. You can easily create other color variations in tune with the winter holidays, so let’s begin!
Step 1
First open a New web document. Using the Type Tool (T), type the text using a font called "Forte", size 200 pt. Set the Tracking for the selected characters to 25 to get more space between the letters. From the Object menu choose Expand then Ungroup to obtain individual compound paths.

Step 2
I’ll be focusing on the first letter, however apply the same steps to the other letters. Copy (Ctrl+C) and Paste in back (Ctrl+B) the letter and change the black fill with Neutral 7. You can find the gradient in the Swatch Libraries menu under Gradients > Neutrals. Having this fill attribute selected in the Appearance panel, go to Effect > Path > Offset Path and apply a 3px Offset.

Step 3
Still having this fill selected in the Appearance panel, go to Effect menu > Stylize and apply the Drop Shadow effect using the settings shown.

Step 4
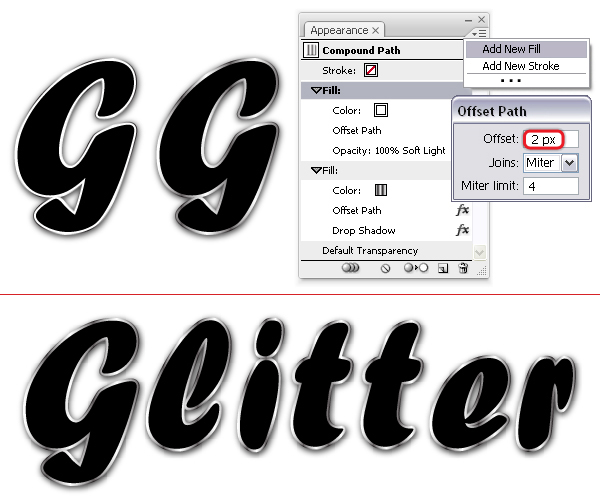
Next, go to the Appearance panel and from the fly-out menu choose Add New Fill. As a result you will get a second fill above the existing gradient. Select white as the fill color then go to Effect > Path > Offset Path and apply a 2px Offset Path. Change the Blending Mode to Soft Light but only for this white fill.
Step 5
Let’s return to the original letters. Replace the black fill with white then go to Effect > Sketch and apply the Note Paper effect using the settings shown.

Step 6
Now, go to Effect > Texture and apply the Stained Glass effect.

Step 7
Finally, go back to Effect > Sketch and apply the Torn Edges effect using the settings from below. As a result of these three effects we obtained a texture similar to glitter.

Step 8
Repeat the last three steps for the other letters and at this point they should look like in the image below.

Step 9
In order to obtain sharp edges we will use a Clipping Mask. Copy (Ctrl+C) and Paste in Front (Ctrl+F) the letter G and remove all the existing appearances. Select this shape and also the glitter-shape and go to Object menu > Clipping Mask > Make. Do the same thing for the rest of the letters.

Step 10
At this step we need copies of the glitter shapes again. Remove all the effects applied and make sure they are in front of everything.

Step 11
Focus on the first letter and fill the copy of the letter from the previous step with a linear gradient called Amethyst. You can find it in the Swatch Libraries menu > Gradients > Gems and Jewels. Drag the middle stop from the center towards the left as indicated then set the Blending Mode to Overlay.

Step 12
Having this Fill attribute selected in the Appearance panel, click on the Duplicate Selected Item icon from the bottom of the panel. As a result you will get the same fill twice. Keep the same gradient but move the middle stop towards the right and set the angle to 180 degrees. Change the Blending Mode from Overlay to Color Dodge to make it shriller.

Step 13
Finally, select a 1pt purple stroke and the letter G is ready. To speed up things you can save this style by dragging the thumbnail from the Appearance panel into the Graphic Styles panel (Window > Graphic Styles).

Step 14
Now, fill the other copies of the letters (Step 10) with the same thing by simply selecting this style from the Graphic Styles panel. At this point the text should look like below:

Step 15
If you don’t want them to look exactly the same you can play a little with the contrast. Having the letter G selected (the shape with the three effects not with the purple gradients) in the Appearance panel double click on the Torn Edges effect applied to open the effect window. There, move the Contrast slider from 16 at 15. For the letter i move the slider at 17 to make it brighter and for the last letter at 14 to make it darker.

Step 16
If you are satisfied with the result you can stop here or you can make the glitter-texture a vector. Select the shape with the three effects applied (without the mask!) and from the Object menu choose Expand Appearance. Next, go to Object > Live Trace > Tracing Options and modify the settings as shown below. When you are done, hit Trace then select Expand from the Object menu. As a result of these actions you will get a group that contains a lot of tiny shapes filled with shades of gray.

Here are the settings: as Mode select Grayscale and increase the number of colors from 6 to 25; check Ignore White then decrease the values for Path Fitting, Minimum Area and Corner Angle to 1px in order to preserve the tiny shapes and curves as accurately as possible.

Step 17
You can easily create other color variations by changing the gradients. Here are a few examples in tune with the winter holidays. Select the front shape of the letter G and replace the Amethyst gradient with Emerald which can be found in the Swatch Libraries menu > Gradients > Gems and Jewels. For the first fill (at the bottom) move the middle stop towards the left and for the second fill towards the right. Also set the angle to 180 degrees. Keep the Blending modes as they are and then change the stroke color. Repeat this process for the other letters or save the graphic style and then just apply it to finish faster.

Step 18
For the red glitter I started from a gradient called Garnet that you can find in the same category. Drag the middle stops then change the stroke color and you are done.

Step 19
The same thing goes for the blue glitter. This time I used a gradient called Sapphire.

Step 20
You can see in the images above a few sparkles scattered here and there. To make them first draw a small circle with the Ellipse Tool (L) and fill it with a radial gradient from white to black. Having this attribute selected in the Appearance panel, go to Effect > Blur > Gaussian Blur and apply a 2px Radius.

Step 21
Add a new fill and use the same gradient. Go to Effect > Distort & Transform and apply the Pucker & Bloat effect.

Step 22
Duplicate the second fill by clicking on the Duplicate Selected Item icon at the bottom of the Appearance Panel. Double click on the Pucker & Bloat effect to open again the effect window and set the value to minus 85%. Having this third fill attribute selected, go to Effect > Distort & Transform > Transform and under Rotate choose an angle of 40 degrees. The last thing to do is to set the Blending Mode to Screen (black becomes transparent) and then you can add a few sparkles above the glittery text.

Conclusion
Here is the final image. You can also use this style to create a glittery background (why not!), to fill or decorate various shapes and objects like: ribbons, gifts, hearts, globes and so on.


.jpg)


0 comments: