Quick Tip: How to Create Glowing Progress Bars

Follow this quick tip and learn how to create a glowing progress bar. We will take advantage of the Appearance Panel and use multiple attributes plus plenty of effects: Outer Glow, Inner Glow, Feather, Drop Shadow, Gaussian Blur and Radial Blur. Let’s begin!.
Step 1
Open a new web document and let’s start with the background first. Take the Rectangle Tool (M) and draw a 600 x 400 px rectangle then fill it with the radial gradient shown. From the Appearance Panel open the fly-out menu and choose Add New Fill. Keep the same gradient then go to Effect menu > Artistic and apply the Film Grain effect. Set the Blending mode to Multiply and lower the Opacity to 50%.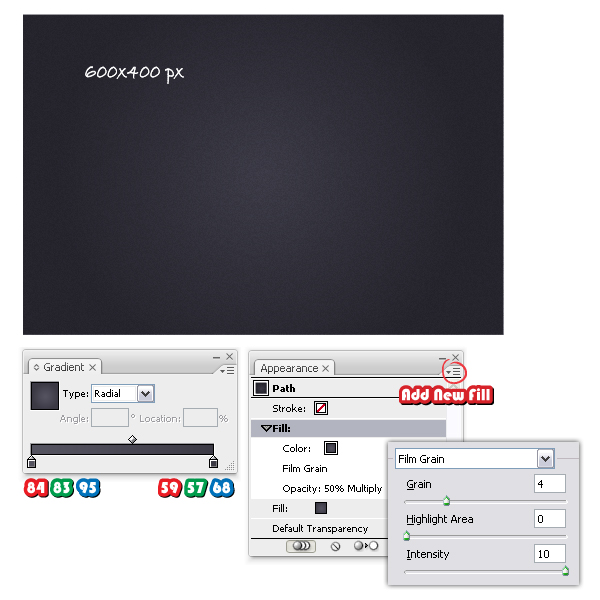
Step 2
Now, take the Rounded Rectangle Tool, click on your artboard and enter the values shown. Fill the rounded rectangle with the color indicated then go to Effect menu > Stylize and apply the Inner Glow effect using the settings from below.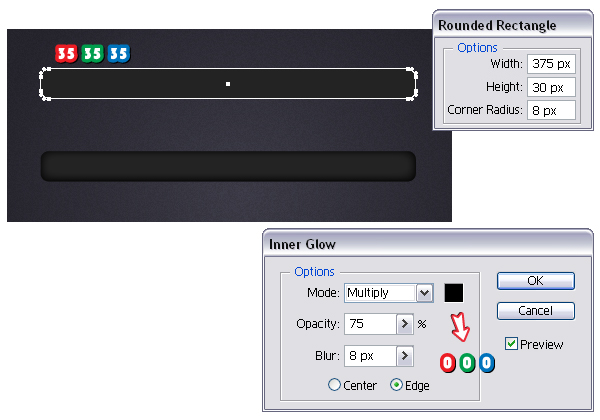
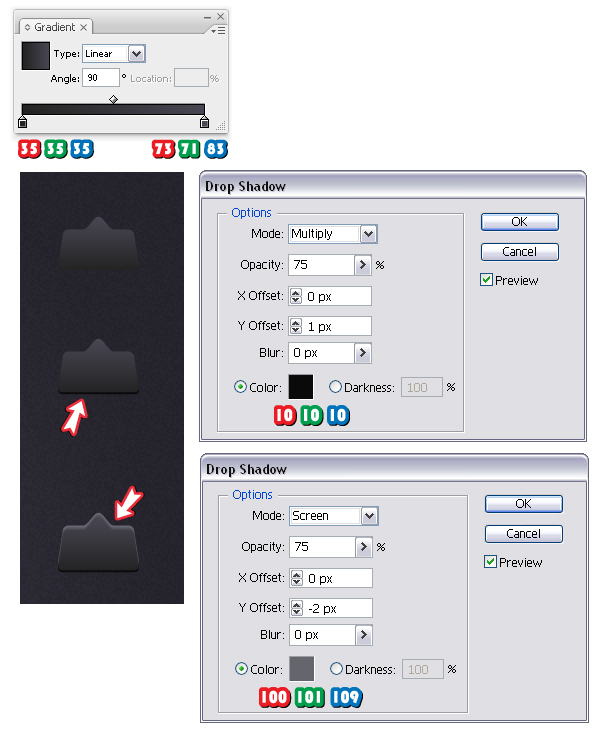
Step 3
Having the rectangle selected, go to Effect menu > Stylize > Drop Shadow and set the values as shown. You will obtain a thin highlight at the bottom.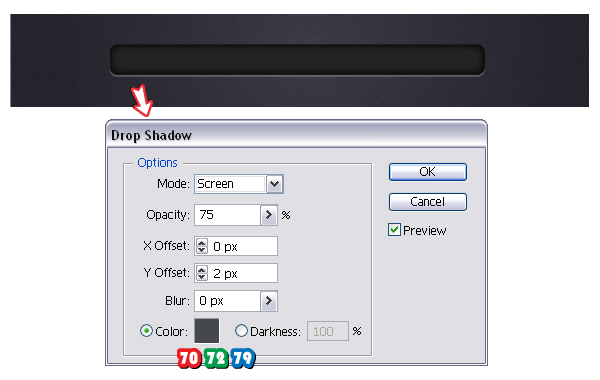
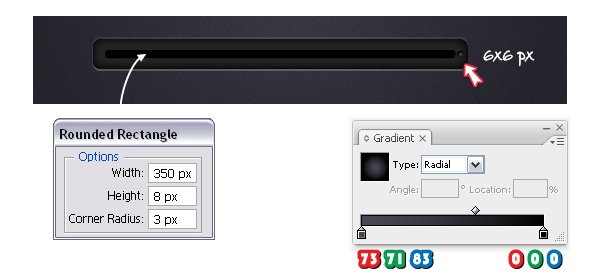
Step 4
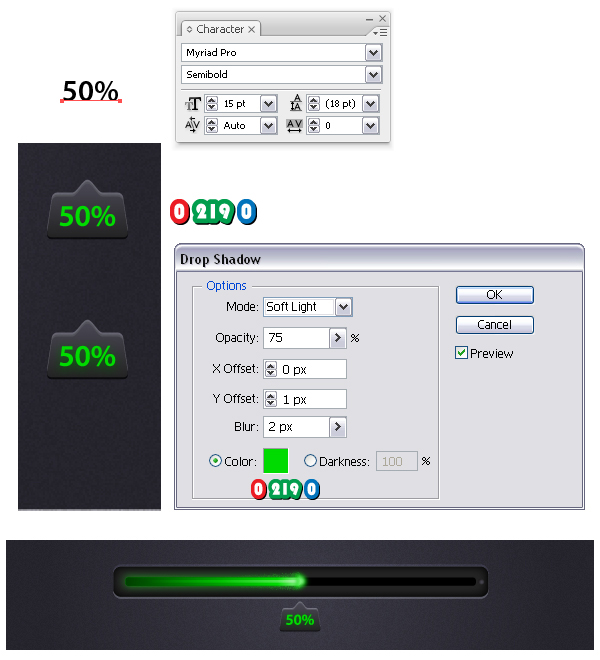
Next take the Rounded Rectangle Tool, click on your artboard and enter the values indicated. Fill the new rectangle with black then select them both and choose Horizontal Align Center and Vertical Align Center from the Align Panel (Window menu > Align).Now, take the Ellipse Tool (L) and draw a tiny circle. Fill it with the radial gradient shown then place it on the right side of the smaller rectangle. This is just for decoration.
Step 5
Take again the Rounded Rectangle Tool and draw another rectangle. Align it in the left side of the smaller rectangle and fill it with the linear gradient shown. I will call this shape from now on-the loading rectangle.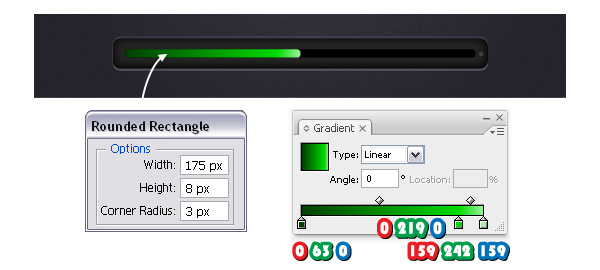
Step 6
Next, with the loading rectangle’s Fill attribute selected in the Appearance Panel, go to Effect menu > Stylize and apply the Outer Glow effect using the settings shown.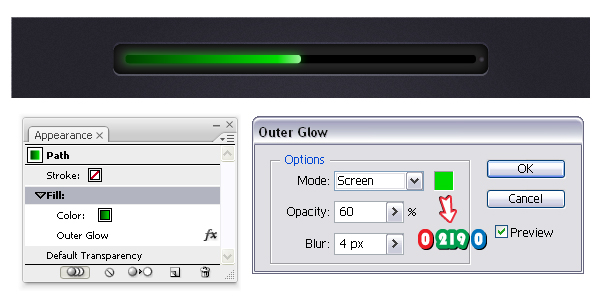
Step 7
Stroke the loading rectangle with green then set the weight to 0.5 pt and select Align Stroke to Outside in the Stroke Panel. Change the Blending mode to Soft Light but only for the Stroke attribute and drag it below the Fill attribute.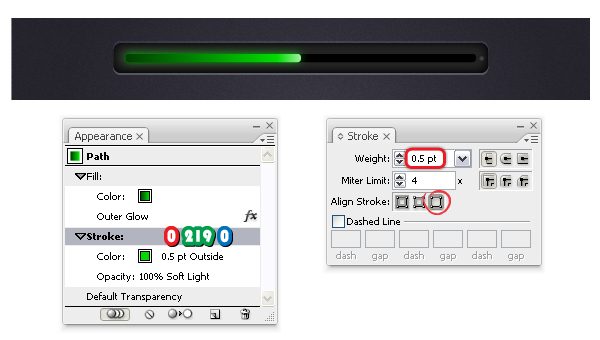
Step 8
Having the loading rectangle selected, in the Appearance Panel open the fly-out menu and choose Add New Fill. Use the gradient shown then go to Effect menu > Path > Offset Path and apply a minus 2.5 px Offset value. Set the Blending mode for this Fill attribute to Screen because in this way black becomes transparent. Next, with this Fill attribute still selected in the Appearance Panel, go to Effect menu > Stylize > Feather and apply a 3 px Radius.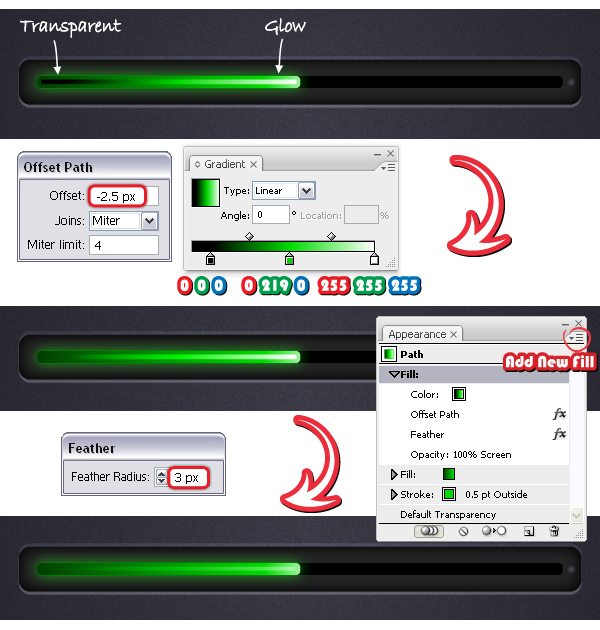
Step 9
Select again Add New Fill and use the gradient from step 5. With this new Fill attribute selected in the Appearance Panel, go to Effect menu > Blur and apply the Radial Blur effect using the settings shown below. Set the Blending mode to Color Dodge and lower the Opacity to 40%. Finally, drag this last Fill attribute at the bottom of the Appearance Panel and you are done with the loading rectangle.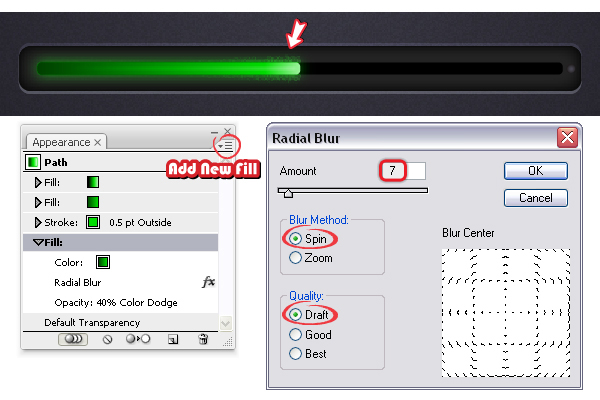
Step 10
Now, take the Ellipse Tool (L) and draw the two oval shapes having the dimensions shown. Arrange them as in the image with the blue ellipse being on top then select them both and click Subtract from shape area > Expand from the Pathfinder Panel.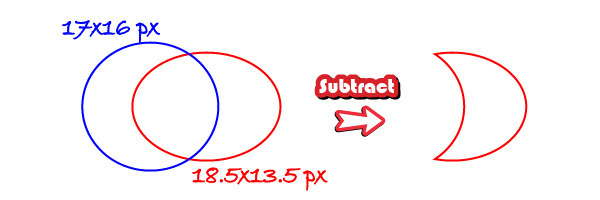
Step 11
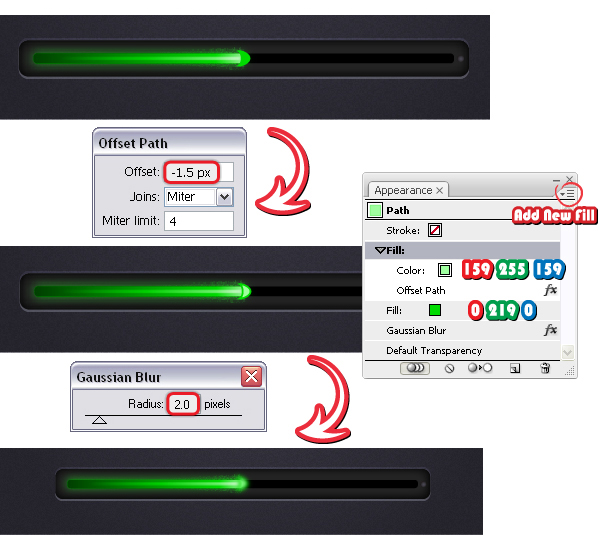
Let’s continue with the loading slider. Take the Rounded Rectangle Tool and draw a rectangle having the dimensions shown. Next, go to Effect menu > Warp > Inflate and apply an 8% Vertical Distortion then from the Object menu choose Expand Appearance and Ungroup. Now, go back to Object menu > Path and use the Add Anchor Points option twice to get the three points at the top. Select using the Direct Selection Tool (A) only the point from the middle and move it up as in the image.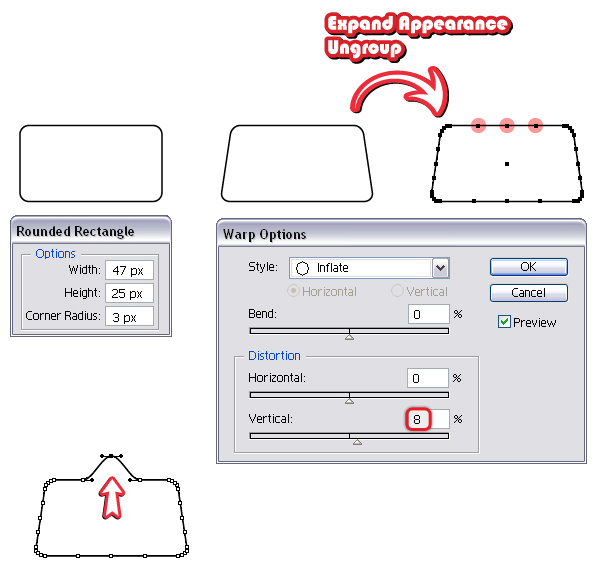
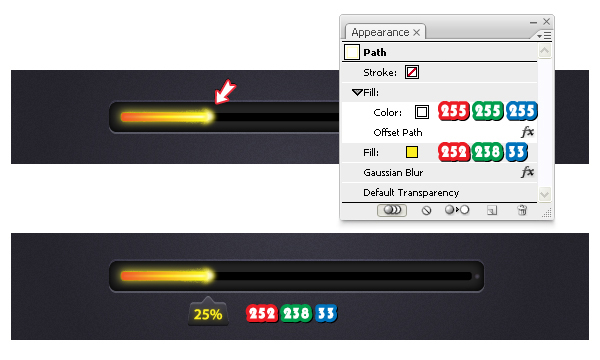
Step 12
You can create other progress bars by simply choosing other color shades plus some minor adjustments. Start with a smaller loading rectangle (25%) then follow again the previous steps because all the settings remain the same, only change the three gradients and the stroke color. Also, depending on the chosen color for the Outer Glow effect (in this case yellow and the next case pink) the Opacity value might vary. Here is set to 100%.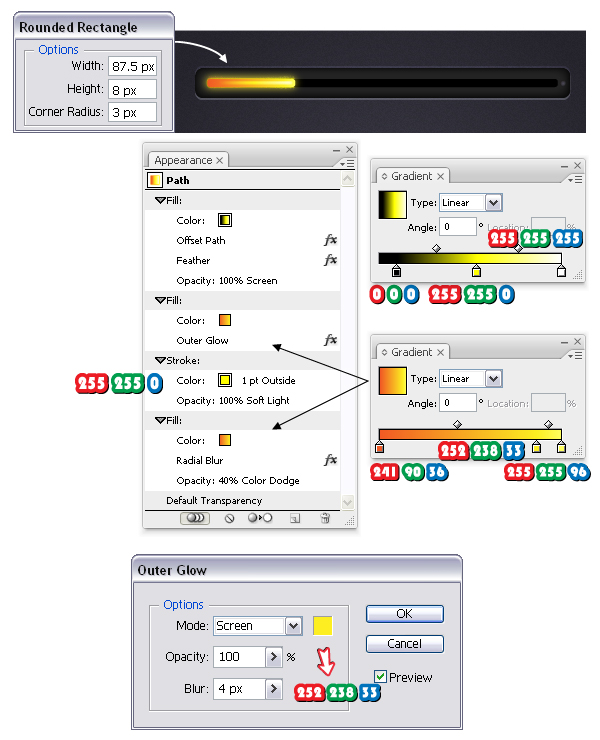
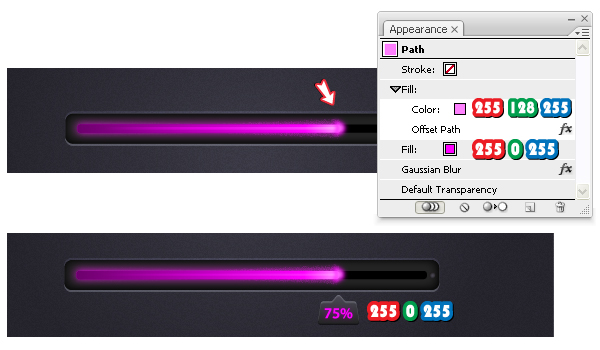
Step 13
This is the pink version. Change the gradients and the colors as shown for the loading rectangle.
Final Image
Here is the final image: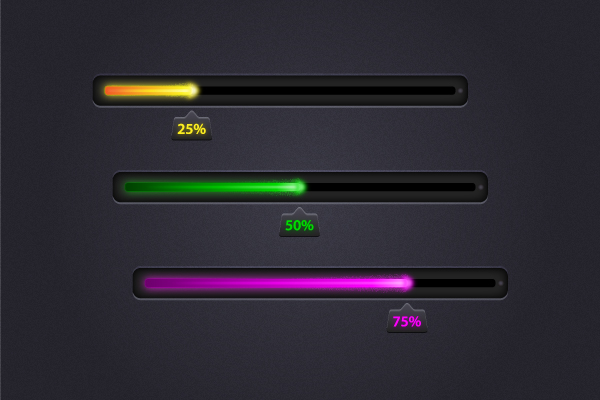
Reference: http://vector.tutsplus.com/tutorials/tools-tips/quick-tip-how-to-create-glowing-progress-bars/

.jpg)


0 comments: